


You can find PLR content easy by going to Google and typing in your niche keyword and then the acronym PLR. So in this case you’d type in “dog training PLR” without the quotes. So here’s what Google unveils to me for the first five results.
From first glance, it looks awesome – I see articles, eBooks, interviews with experts – even audio and graphics in some packages! Lots of good stuff to offer free and use as on-going content mixed with affiliate links.
The list goes on for a long time, so you’ll want to sift through the sites and determine who offers what and for the best price. Once you find someone whose writing is of top quality, bookmark the site for your future autoresponder emails.
There are two other options for you in creating content. You can write it yourself or outsource the writing task to a freelance service provider on a site like Elance.com. If you outsource it, expect to pay approximately $10 per page for decent writing – more if you want perfectly polished content. Make sure you question what a “page” is for the writer.
Some will use large font and you only get 250 words to a page where others will use smaller font and spacing, so you get 400+ words to a page for the same amount.
And always check the content through a site like CopyScape to see if the writer has plagiarized the deliverables. Even at $10 per page, you’re supposed to be getting 100% unique and original content.
If you feel confident writing content yourself, then here’s what you’re going to do:
Create either a 5 page report or a weekly or daily email lesson for your autoresponder series. These can be 250 words a piece and you can hyperlink to one of the products that you’re promoting OR, send them to one of your blog posts.
Create one 250-word blog post daily using a keyword phrase from the list that you initially downloaded. You want to use it in the title of the post, in the first sentence, and again somewhere in the end of the post. Tag the blog post with your keyword.
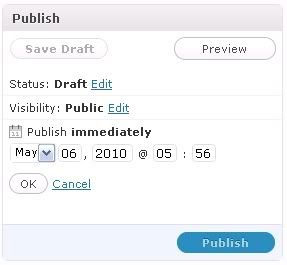
If you get antsy, feel free to write more than one and just queue them up in your blog for a later date. To do this, on the Add New Blog Post page, just click the Edit button next to Publish Immediately. This will open up the following screen where you can set the exact date and time you want the blog post to go live!
Plug Your Content and Links Into Your Autoresponder
Let’s say you buy a pack of 52 dog training articles. Gather 52 (if possible) affiliate product links from your niche and in each email you plug into your system, add a link to one of the ones you choose to promote.
One of the most popular autoresponder systems you can use is Aweber. When you log into Aweber, click the top where it says Create and Manage Lists. Then click Create a New List.
You’ll be asked to pick a unique list name, give it a description, and include some contact information.

Go to Step 2, where you can customize the initial confirmation to the subscription email. Save the list settings.
Next click Messages and then choose Follow Up. This is where you’ll queue up all of your coming emails. Space them daily, every 3-4 days or weekly – whatever you want to do.
Paste the title and message into the follow up and save it. You have the option of tracking clicks or leaving them as is. If you choose tracking, Aweber will make it look different, so if you want to brand your site name, don’t track clicks. Make sure you test a message or two to see if you’re doing it correctly.
Now you want to create a web form to put on your blog or website so that you can start building a list!
Click the Web Forms link at the top of Aweber. Then click Create Web Form. It gives you many options, but make sure you choose something that will fit in the sidebar of your blog or whatever space you have for your form.
Choose from one of the new Aweber templates or design it any way you like. Then click Save Web Form and Go To Step 2. Click Go to Step 3 (unless you want to name this form) and choose “I Will Install My Form” and the Raw HTML version. Copy the code it gives you because we’re going to plug it into our blog sidebar in a widget.
Open up the widgets area as you did before and add a Text widget at the very top of the sidebar. Paste the code into the box, save and close the widget. Now go to your domain and make sure the opt in box works by signing up for the list yourself.

Setting Up Your Affiliate Marketing Simple System
Choose a More Narrow Niche
Find Affiliate Products to Promote
Set Up Your Home on the Web
Content For Your AutoResponders
Affiliate Marketing Autopilot
Taking Your Affiliate Marketing Simple System to the Next Level
Don’t Make These Three Critical Mistakes
Choose a More Narrow Niche
Find Affiliate Products to Promote
Set Up Your Home on the Web
Content For Your AutoResponders
Affiliate Marketing Autopilot
Taking Your Affiliate Marketing Simple System to the Next Level
Don’t Make These Three Critical Mistakes


